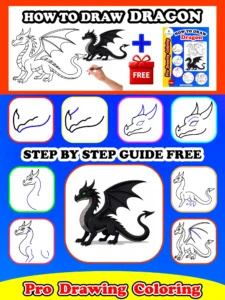
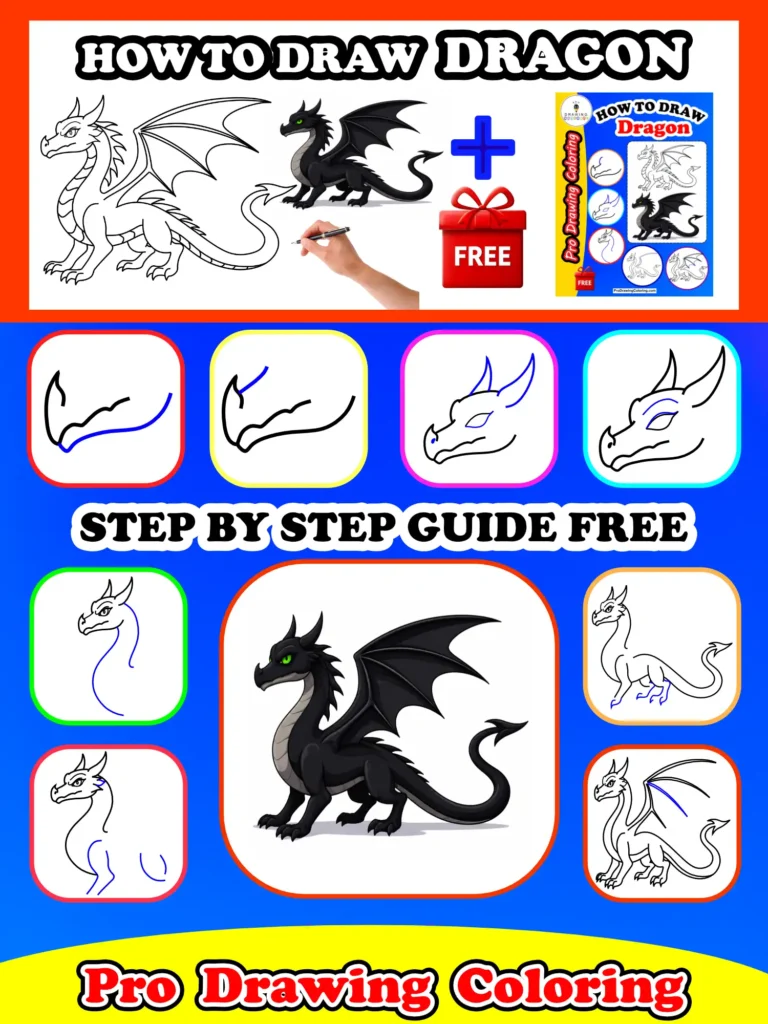
How to draw a dragon is one of the most exciting challenges for any artist, whether you’re just starting out or looking to refine your mythical creature skills. At Pro Drawing Coloring, we’ve simplified the entire process to ensure you can create a legendary masterpiece every time.
If you’ve been searching for a dragon drawing easy enough for beginners but detailed enough to look like a realistic dragon drawing, you are in the right place. To help you master these techniques faster, we have prepared a free digital PDF book pack! This complete guide includes our exclusive practice sheets and professional tips to help you perfect every detail, from the sharpest claws to the most majestic wings.
Let’s dive into this dragon drawing step by step tutorial and bring your fantasy world to life!
Master the Art: Comprehensive Dragon Drawing Guides Step by Step
Starting a complex illustration can feel overwhelming, but the secret lies in breaking it down into simple, manageable shapes. Our dragon drawing guides step by step are specifically designed to lead you through the entire creative process, from the first curve of the snout to the final flick of the tail. By following this structured path, you’ll understand the anatomy and flow of this mythical creature, making it easier than ever to build professional-looking art. Whether you’re a beginner or a seasoned creator at Pro Drawing Coloring, these visual stages will help you develop the confidence to draw dragons that look both powerful and perfectly proportioned.
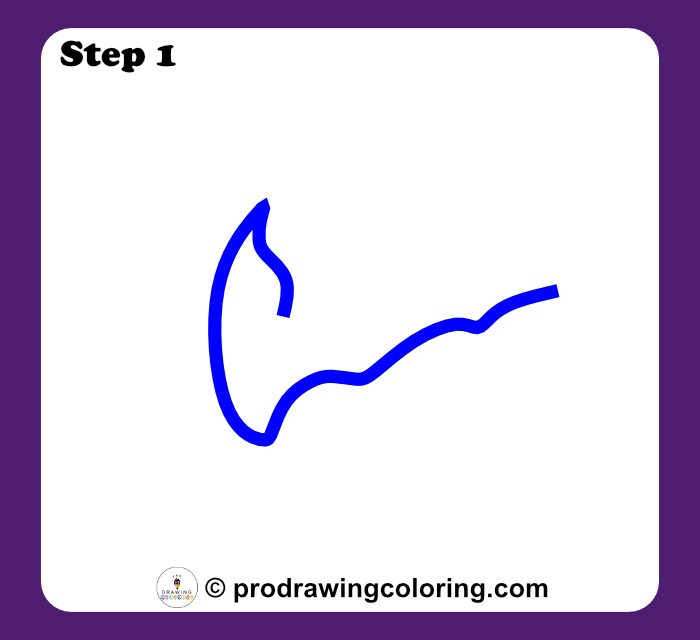
Step 1: Draw the Snout Profile
Begin by drawing the top profile of the snout. Create a wavy line with a small pointed horn at the tip, extending toward the head.
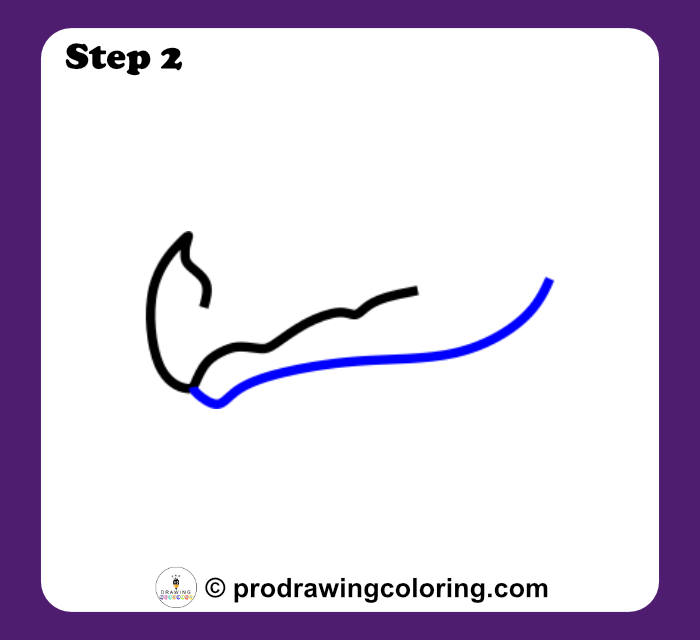
Step 2: Add the Lower Jaw
Draw a long, slightly curved line beneath the snout to form the lower jaw, extending it backward.
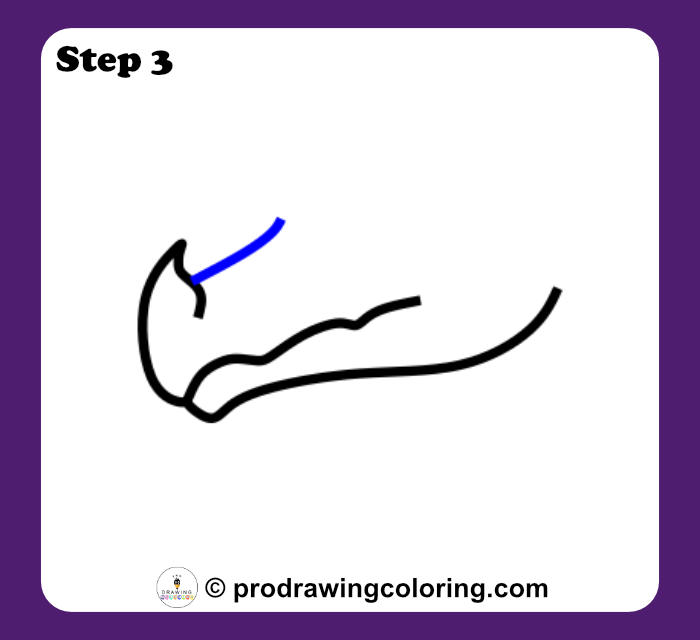
Step 3: Define the Nose Bridge
Add a short slanted line to define the bridge of the nose leading toward the eye area.
Step 4: Sketch the Brow Ridge
Draw a high curved arch above the eye area to represent the brow ridge and create a strong expression.
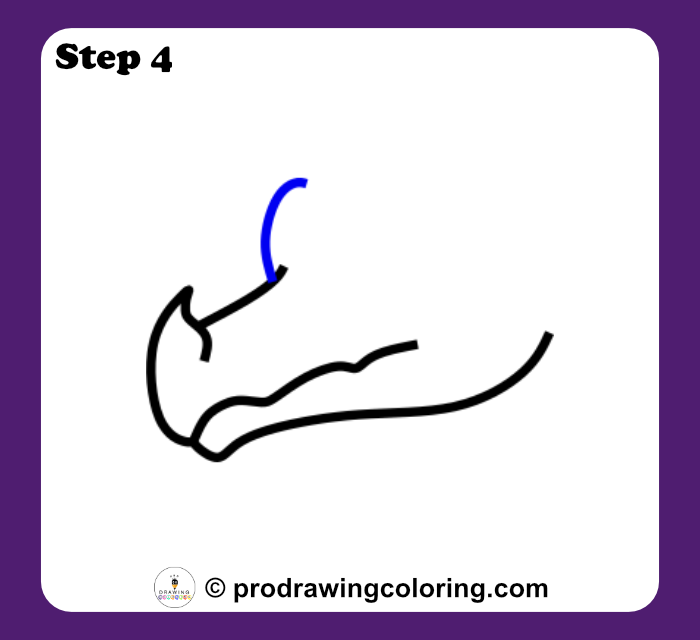
Step 5: Form the Back of the Head
Shape the back of the head with a long curve and add a smaller inner curve to define the cheek area.
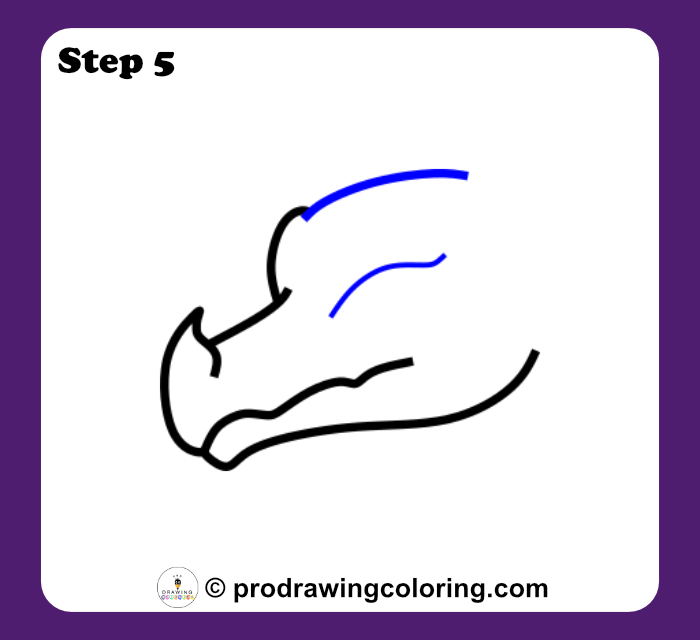
Step 6: Add Horns and Eye Base
Sketch two large pointed horns curving upward from the head. Add a nostril dot and outline the almond-shaped eye.
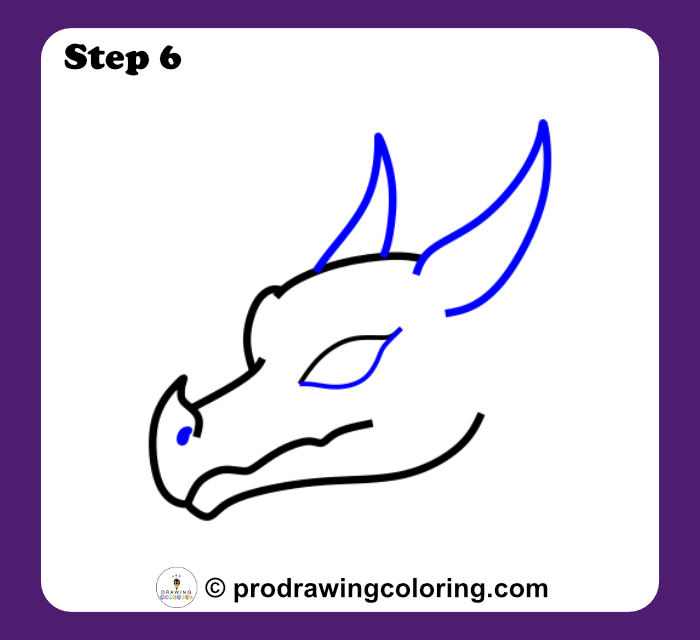
Step 7: Add the Upper Eyelid
Refine the eye by drawing a curved line above it to create a defined upper eyelid.
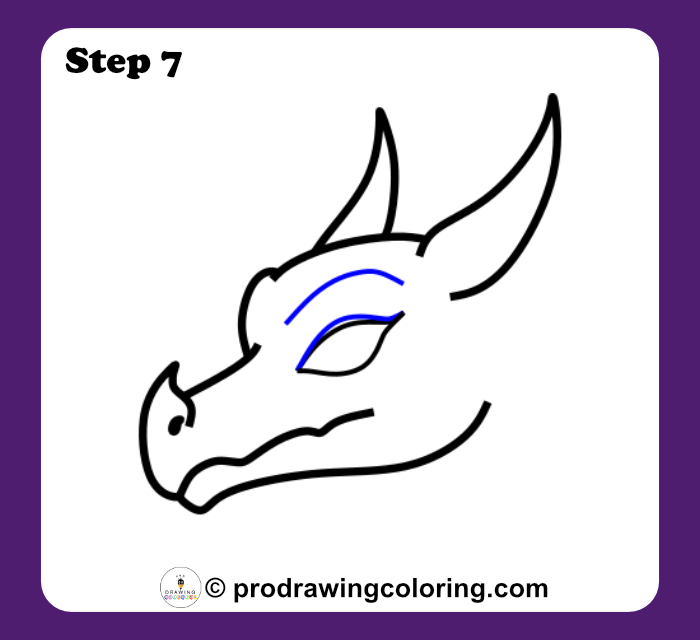
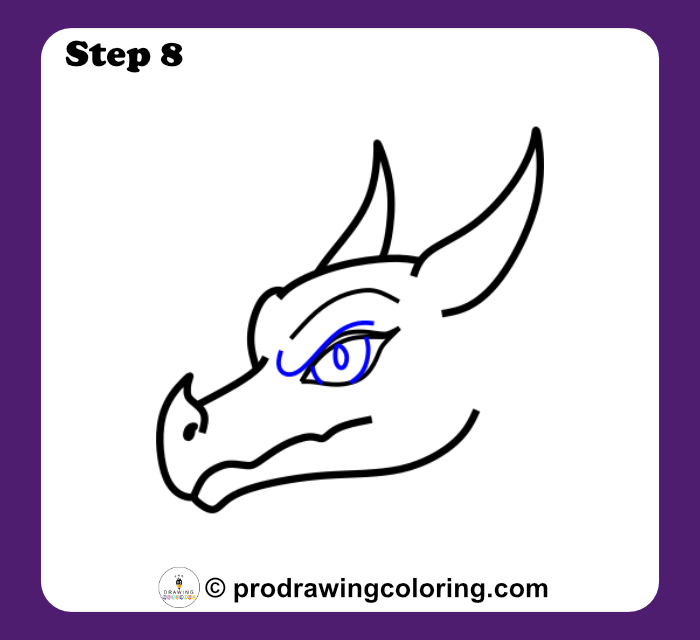
Step 8: Detail the Iris and Pupil
Add the iris and pupil inside the eye shape to give the dragon a focused look.
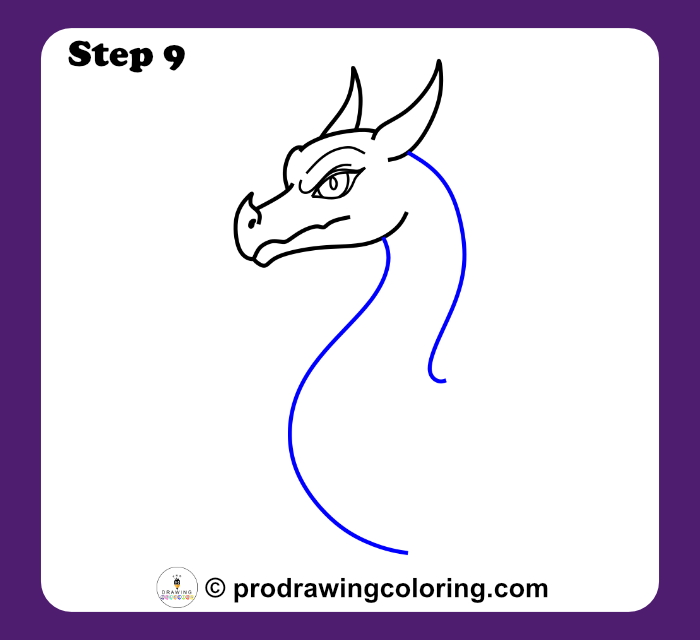
Step 9: Create the Long Neck
Draw two long, elegant S-shaped curves extending downward from the head to form the dragon’s neck.
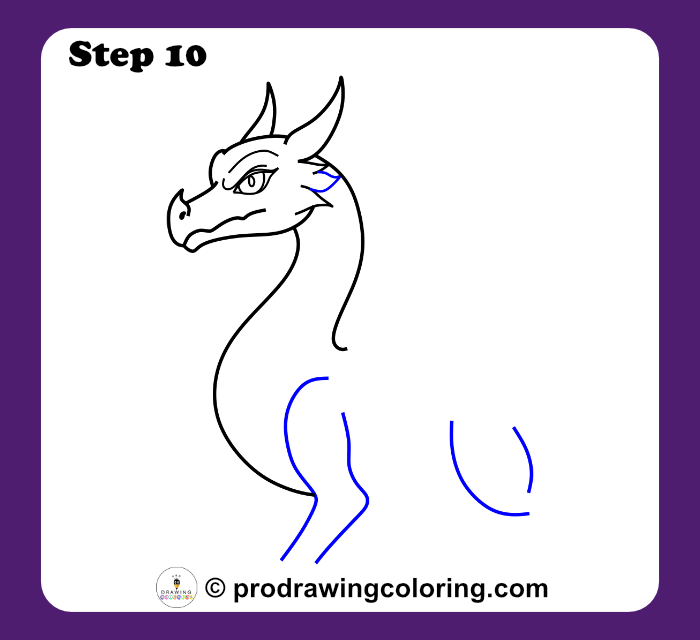
Step 10: Outline the Legs
Add small spikes to the back of the head and begin outlining the front and back legs using vertical curved lines.
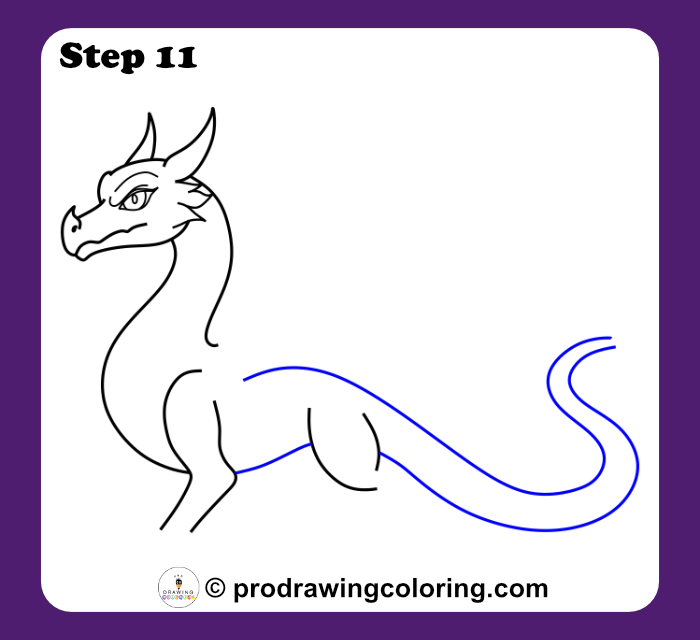
Step 11: Arch the Back and Tail
Draw a long flowing curve from the back of the neck forming the arch of the back and extending into a winding tail.
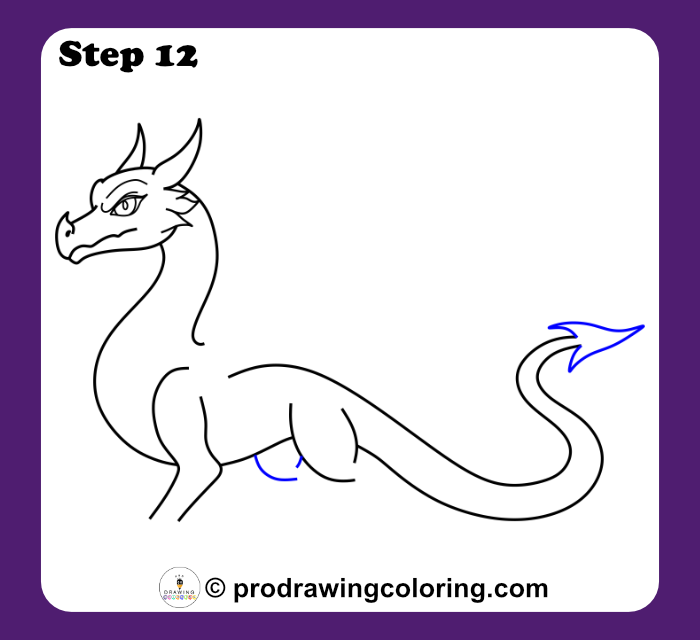
Step 12: Add the Tail Tip
Create a pointed arrowhead shape at the end of the tail and draw a small curved line for the underside of the belly.
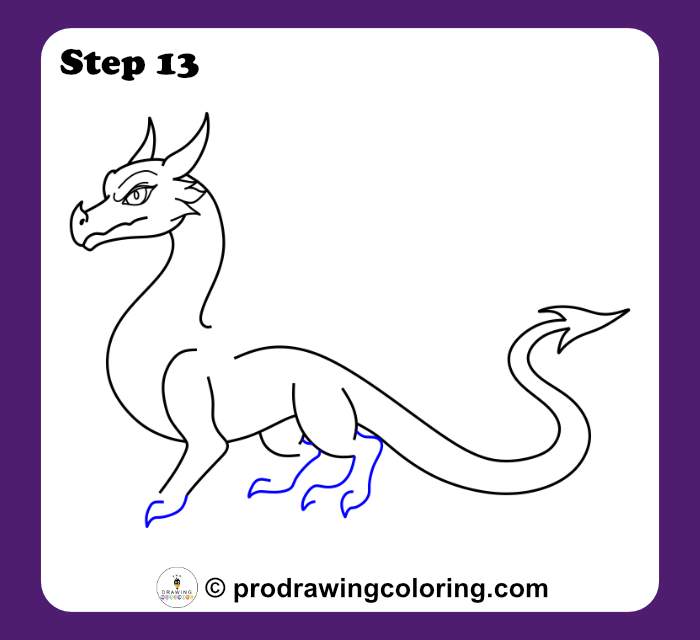
Step 13: Shape the Feet
Outline the bottom of all four feet using simple rounded shapes to define the dragon’s stance.
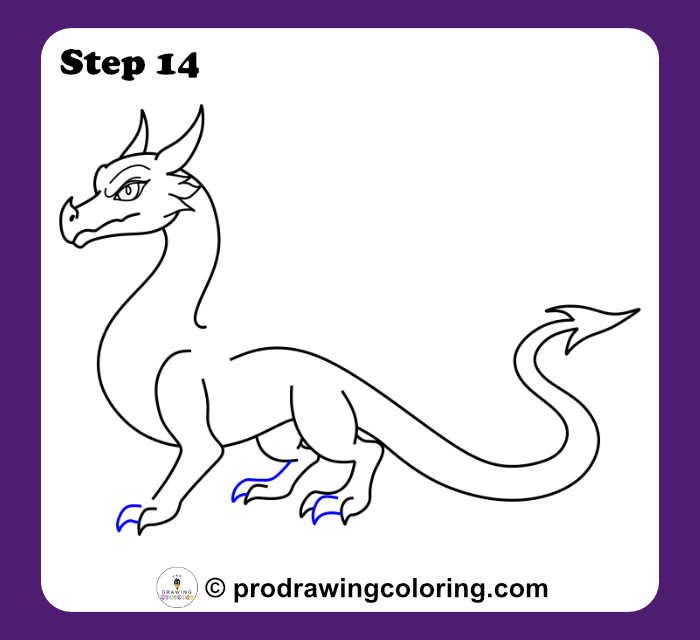
Step 14: Add Sharp Claws
Sketch sharp pointed claws at the end of each foot to give the dragon a powerful appearance.
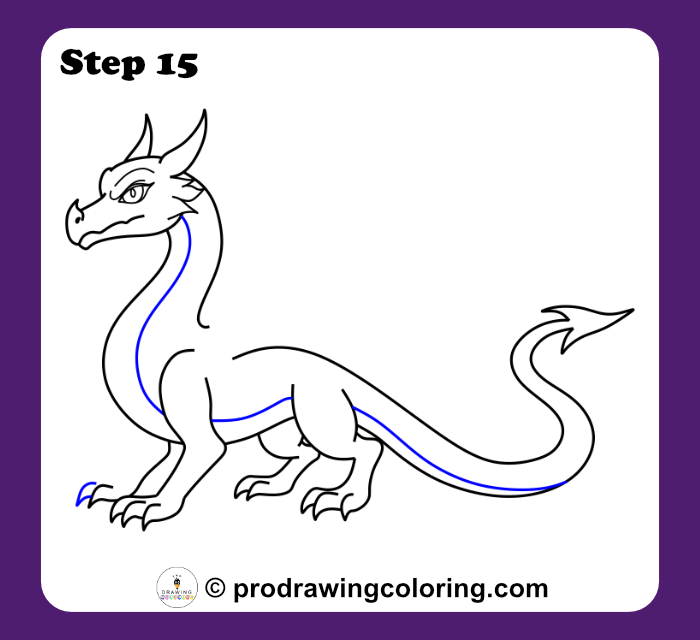
Step 15: Define the Underbelly
Draw a long internal line following the curve of the neck, belly, and tail to define the underbelly area.
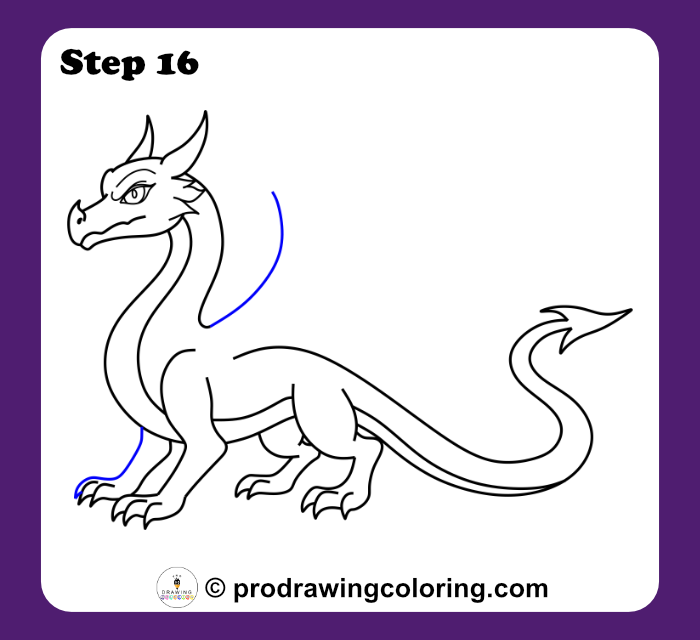
Step 16: Sketch the Initial Wing Bone
Draw a vertical wing bone extending upward from the shoulder and refine the front leg slightly.
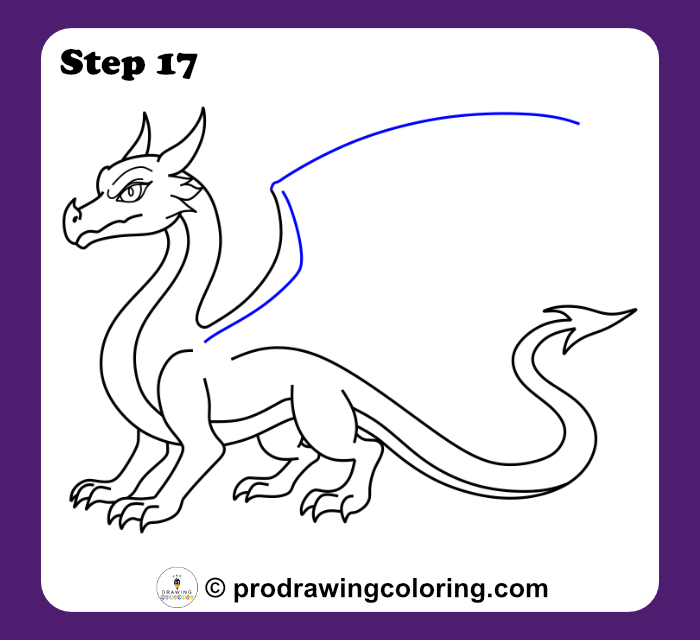
Step 17: Draw the Main Wing Structure
Add the primary wing bone as a long elegant arch extending outward from the vertical support.
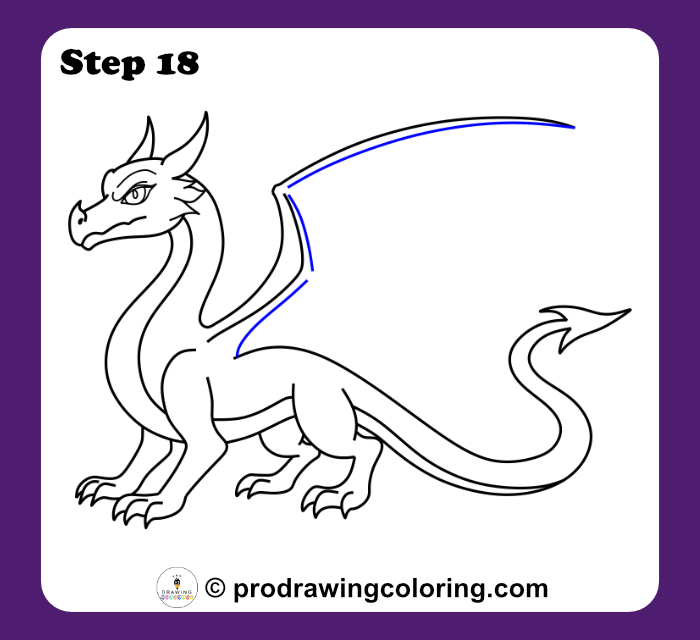
Step 18: Thicken the Wing Bone
Add a parallel line below the main wing bone to give it thickness and structure.
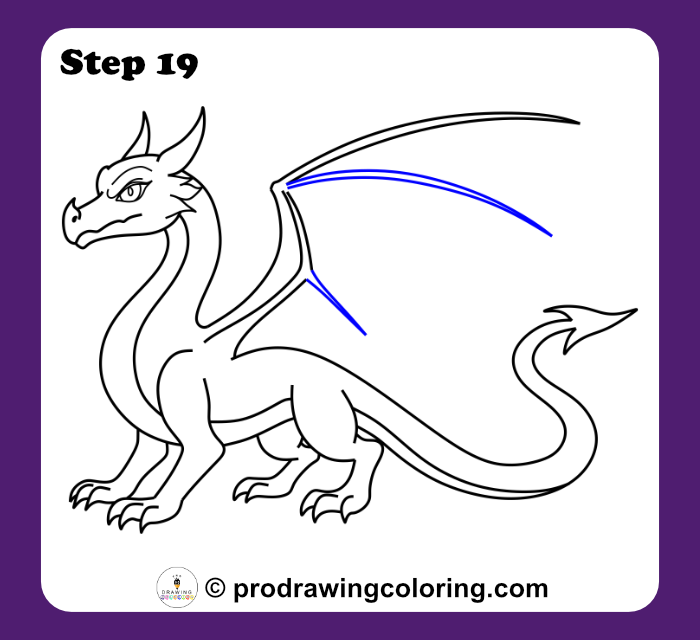
Step 19: Sketch the Wing Ribs
Draw two supporting ribs extending downward from the main wing joint.
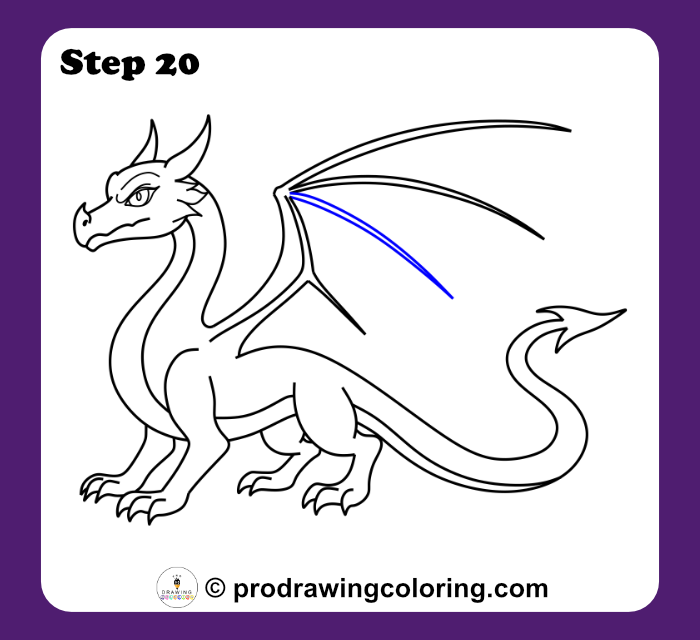
Step 20: Complete the Rib Frame
Add a third supporting rib to complete the structural frame of the wing.
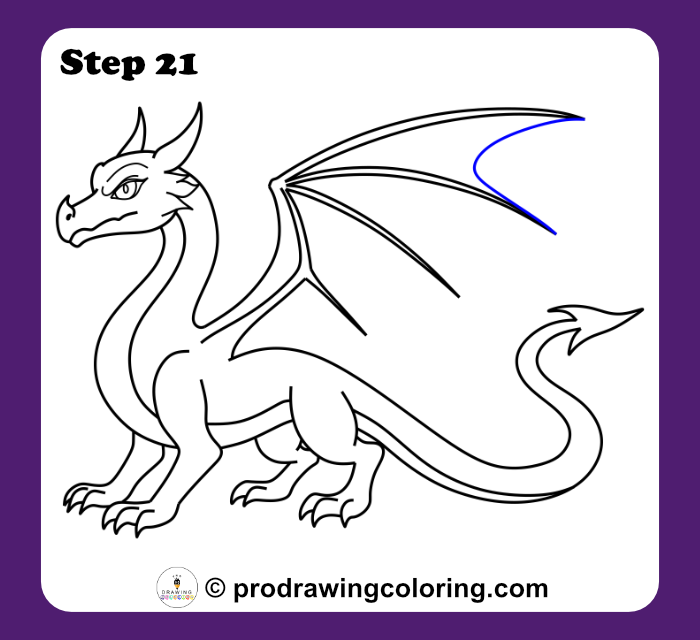
Step 21: Connect the Wing Membrane
Connect the tip of the main wing bone to the first rib with a curved line forming the top membrane edge.
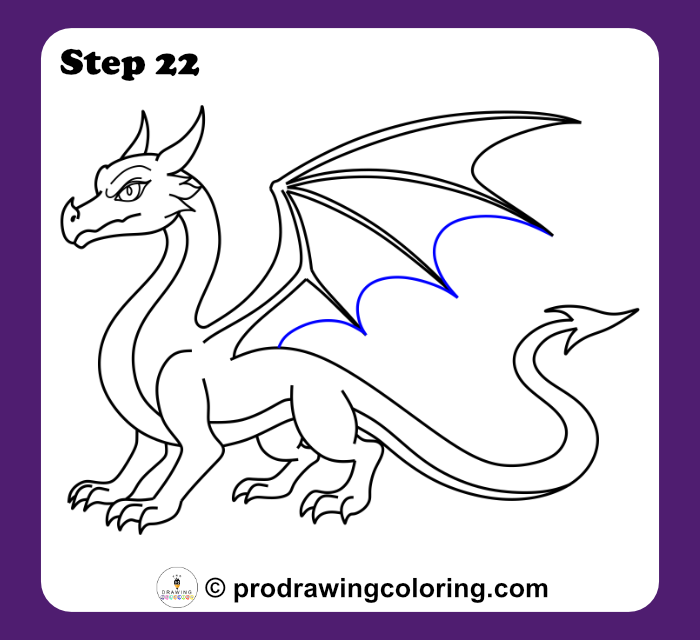
Step 22: Draw Scalloped Wing Edges
Draw inward curved scalloped lines between each rib and connect the final curve to the dragon’s back.
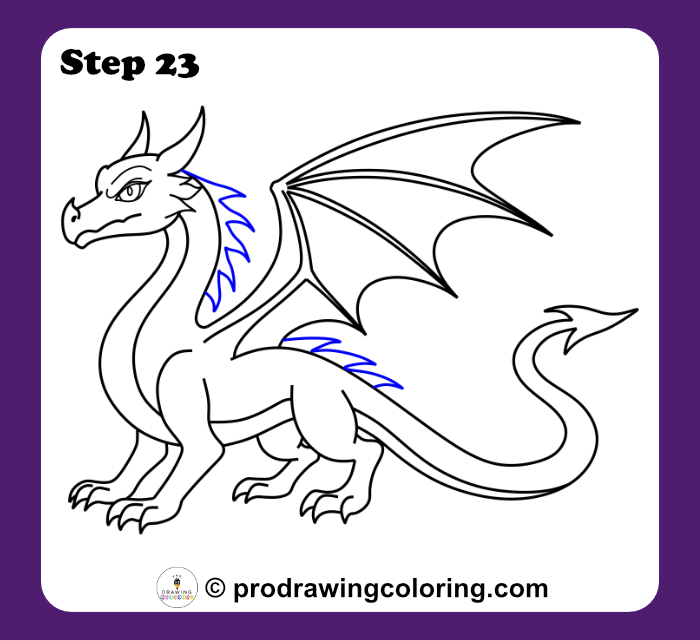
Step 23: Add Dorsal Spikes
Add sharp jagged dorsal spikes along the neck and back ridge for a fierce look.
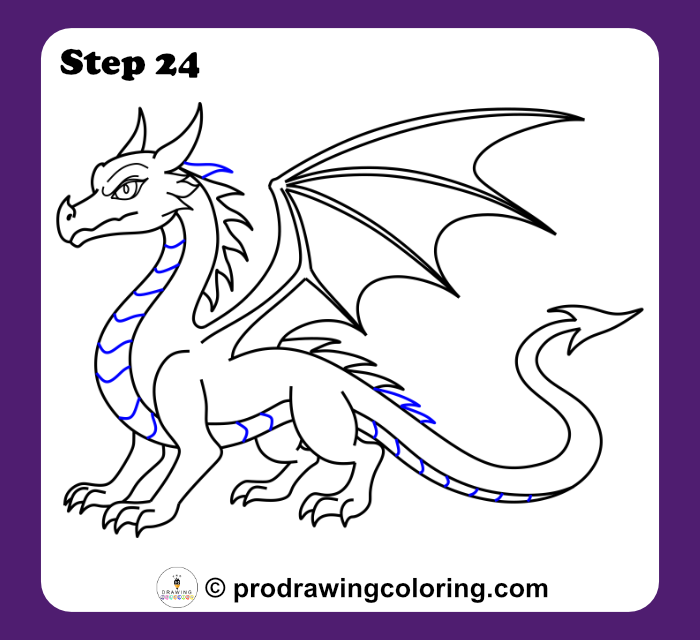
Step 24: Finalize with Scales
Finish by adding horizontal scale segments along the entire underbelly from chin to tail tip.
Unlock Your Creativity: Download Your Free Easy Dragon Drawing Pack PDF
We want to make sure you have everything you need to succeed, even when you’re away from your screen! To support your artistic journey, Pro Drawing Coloring has curated an exclusive easy dragon drawing pack PDF that you can download for free. This digital workbook is more than just a guide; it’s a complete practice toolkit featuring high-quality templates, tracing outlines, and extra tips to help you master the 24 steps offline. Perfect for students, hobbyists, or parents looking for educational creative activities, this free PDF pack is your shortcut to mastering legendary creatures at your own pace.
More Easy Drawing Tutorials
If you enjoyed drawing a dragon, try these fun step-by-step guides next:
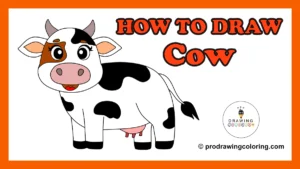
- Practice farm animal basics: How to Draw a Cow
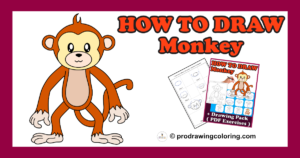
- Draw a playful jungle friend: How to Draw a Monkey
- Create a cute character style: How to Draw Hello Kitty
- Prefer coloring instead? Dragon Coloring Pages