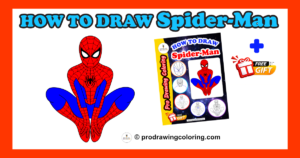
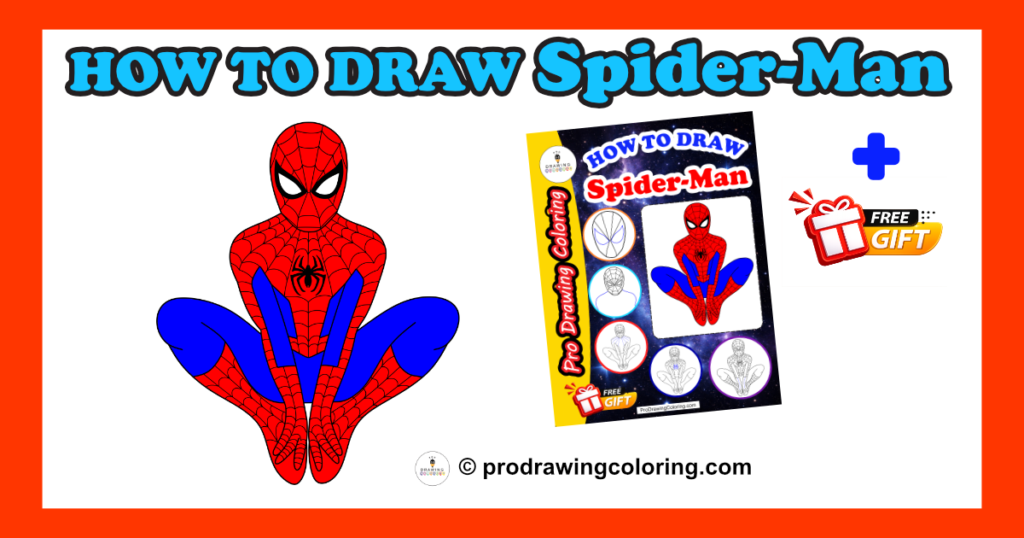
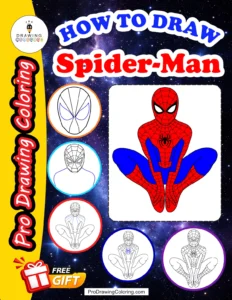
Welcome to Pro Drawing Coloring, your ultimate resource to learn how to draw Spiderman through professional and easy-to-follow art tutorials. Have you ever wanted to capture the web-slinger’s iconic look but didn’t know where to start? Look no further! We’ve developed a massive, 27-step detailed guide that breaks down everything from the basic proportions to the complex suit webbing.
Whether you’re looking for an easy spiderman drawing for beginners or a comprehensive spiderman drawing step by step to sharpen your skills, this tutorial has it all. We turn the challenge of a spiderman sketch into a fun, manageable project for artists of all ages.
Why This Pro Drawing Coloring Guide is Different:
To ensure you succeed, we’ve packed this page with premium resources:
- Detailed 27-Step Tutorial: No steps skipped—we guide you through the spiderman face drawing, torso, and dynamic crouching pose.
- Video Tutorial: Prefer watching the ink flow? Follow along with our how to draw spiderman video integrated below for a real-time look at the techniques.
- FREE Artist Gift Pack: Download our Exclusive Printable Artist Pack! It includes our 27-step guide and professional techniques to help you transition from a beginner to a confident artist.
- Get Familiar with the Forms: If you want to study the suit details before you start sketching, check out our extensive collection of Spiderman coloring pages to practice your color theory first.
What You Will Master Today:
- Proportions & Poses: Learn the secrets behind a dynamic spiderman body drawing.
- The Iconic Mask: Perfecting the spiderman mask drawing and those expressive, classic eyes.
- Advanced Webbing: How to use our printable artist techniques to draw the web pattern with perfect symmetry.
Ready to bring your favorite Marvel hero to life? Grab your pencils, fire up the video tutorial, and let’s start Step 1 of this Pro Drawing Coloring masterpiece!
Master Your Spiderman Drawing Step by Step
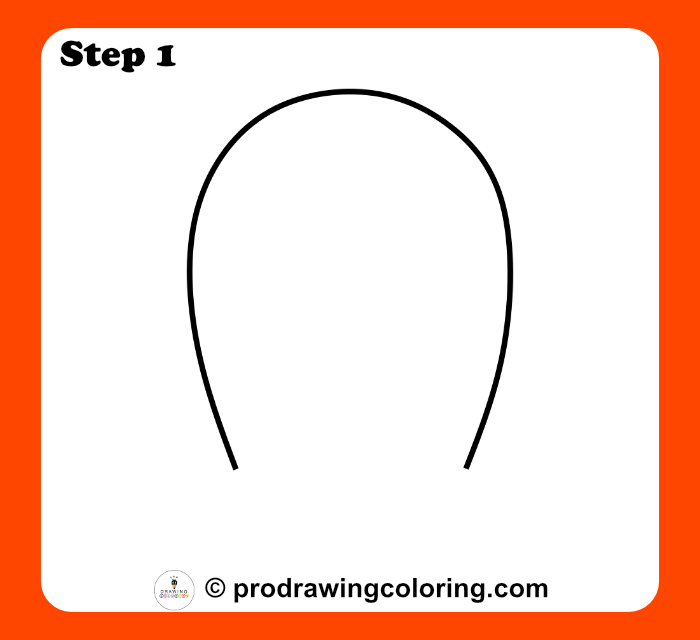
Step 1: Start with the Top Arch
Begin your Spiderman drawing by sketching a large, smooth arch for the top of the head.
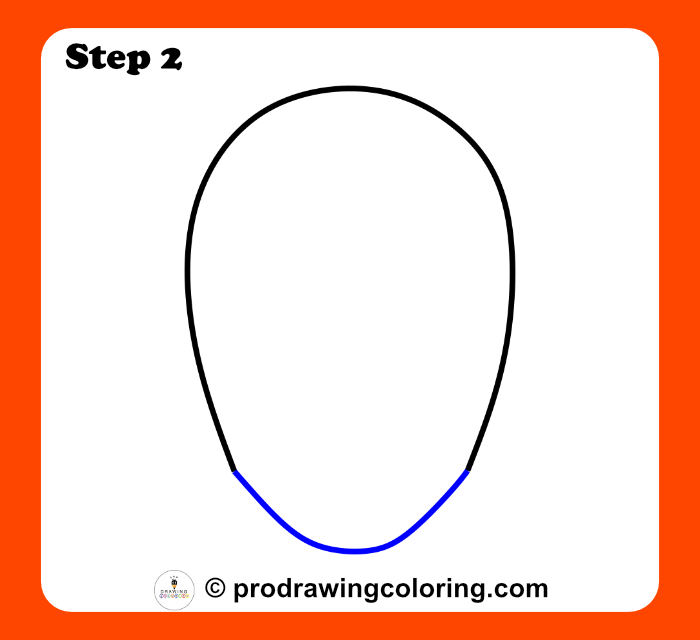
Step 2: Form the Jawline
Complete the head structure by adding a curved V-shape at the bottom to define the chin.
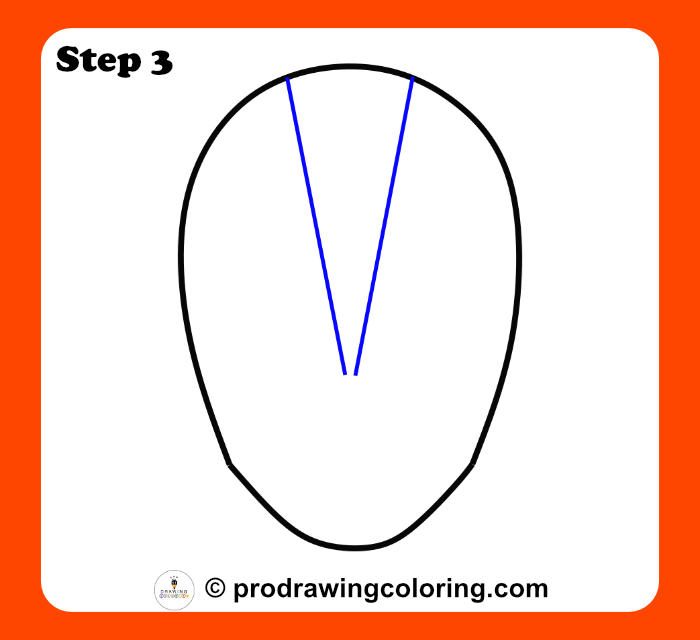
Step 3: Add Center Web Guides
Draw two diagonal lines meeting in the center to start the iconic mask web pattern.
Step 4: Expand the Web Base
Sketch two more diagonal lines pointing toward the upper corners of the mask.
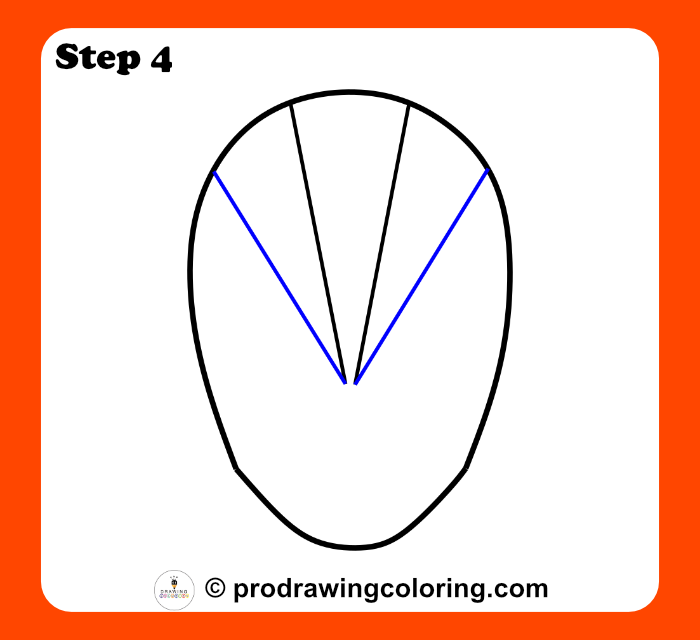
Step 5: Complete the Vertical Lines
Add the final two vertical lines at the bottom to finish the mask’s foundation.
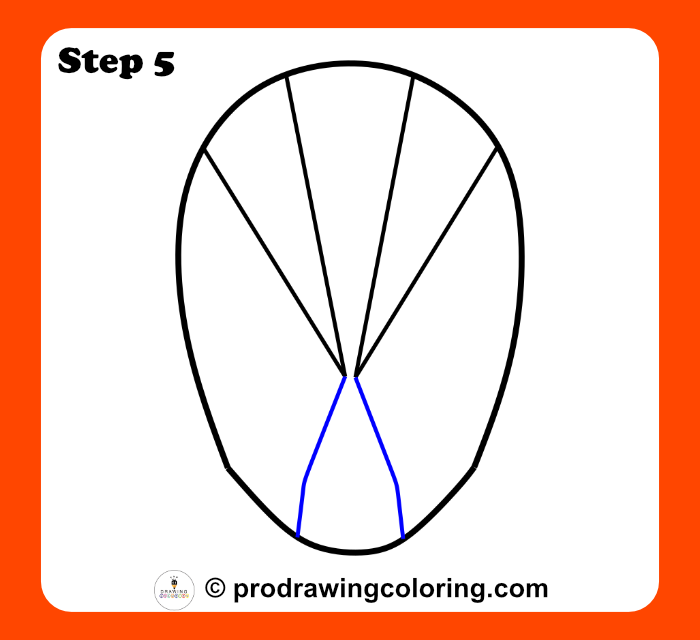
Step 6: Outline the Iconic Eyes
Draw two large, curved triangular shapes to create Spiderman’s famous expressive eyes.
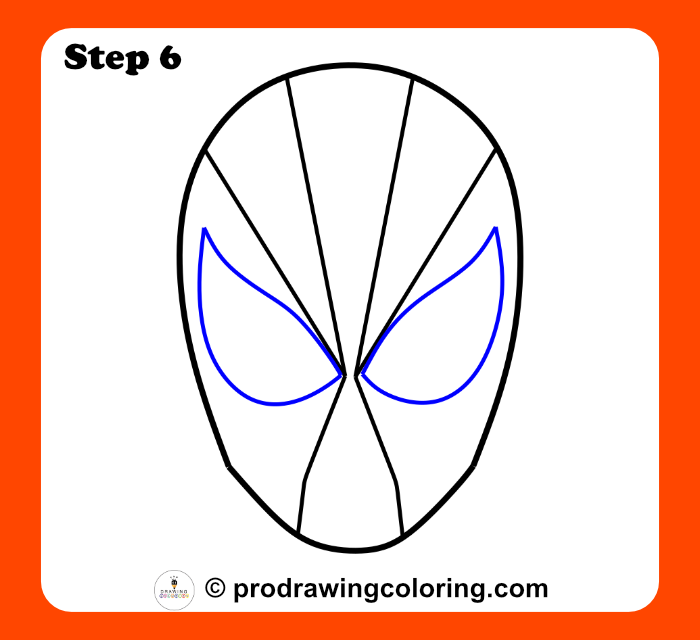
Step 7: Add Eye Borders
Trace a smaller shape inside each eye to create the thick black border effect.
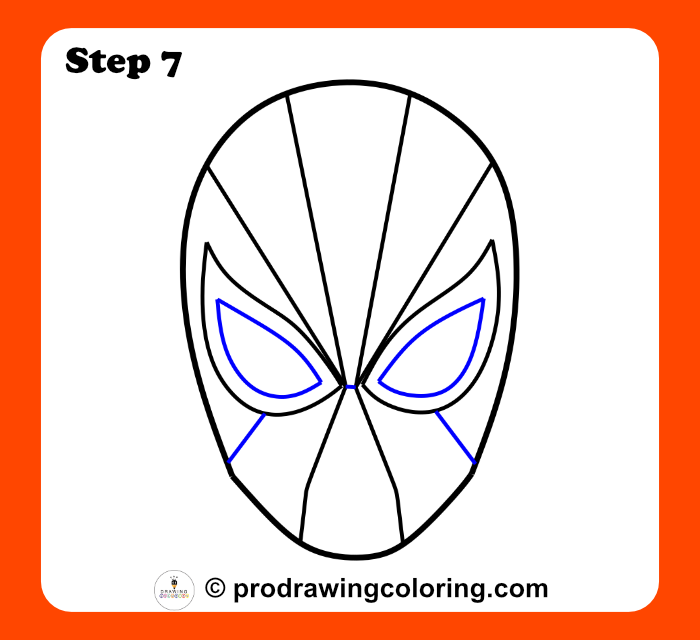
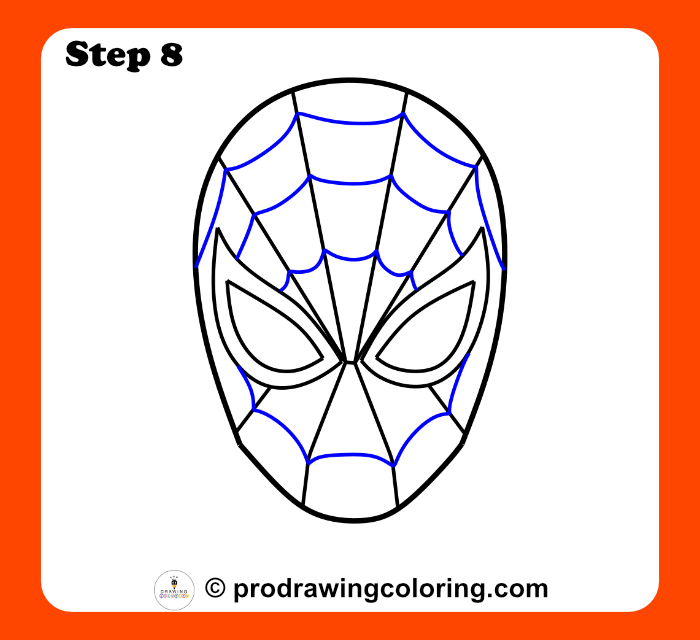
Step 8: Sketch the Curved Webs
Connect the vertical spokes with small inward-curving arches across the top of the mask.
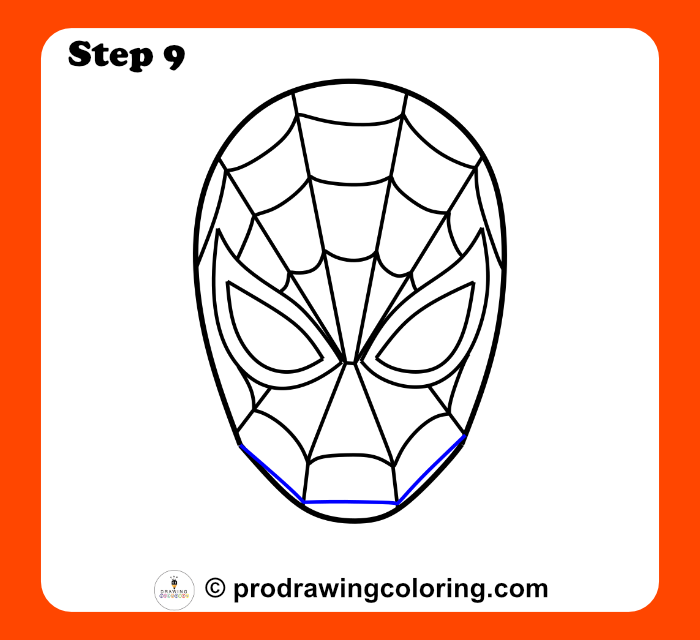
Step 9: Finish the Chin Webs
Complete the web pattern by adding the curved horizontal lines to the lower mask.
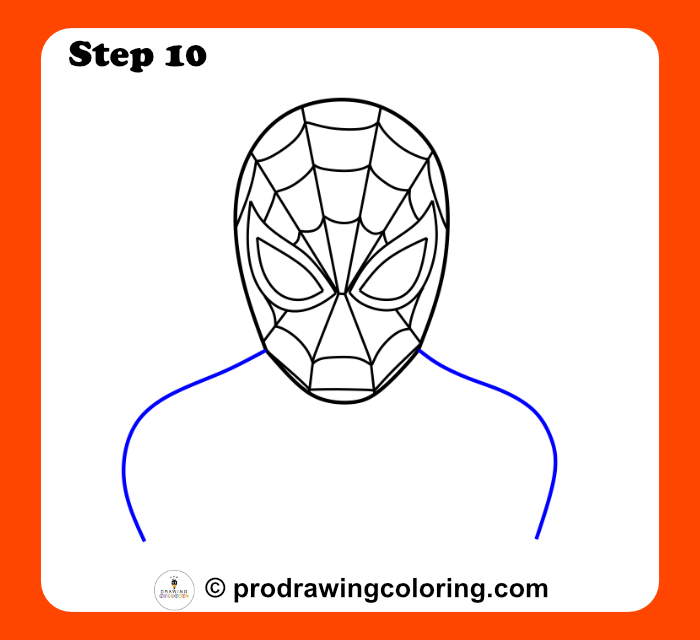
Step 10: Sketch the Shoulders
Draw two broad curves extending from the neck to establish the upper Spiderman body structure.
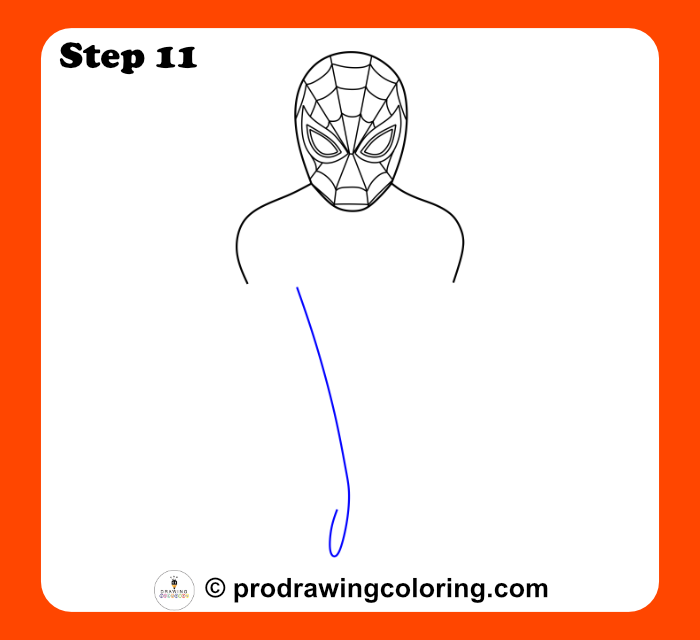
Step 11: Add a Central Body Guide
Draw a long vertical line from the chest downward to guide the placement of the torso and legs.
Step 12: Complete the Lower Guide
Add a second diagonal line crossing the first at the bottom to define the leg and feet positions.
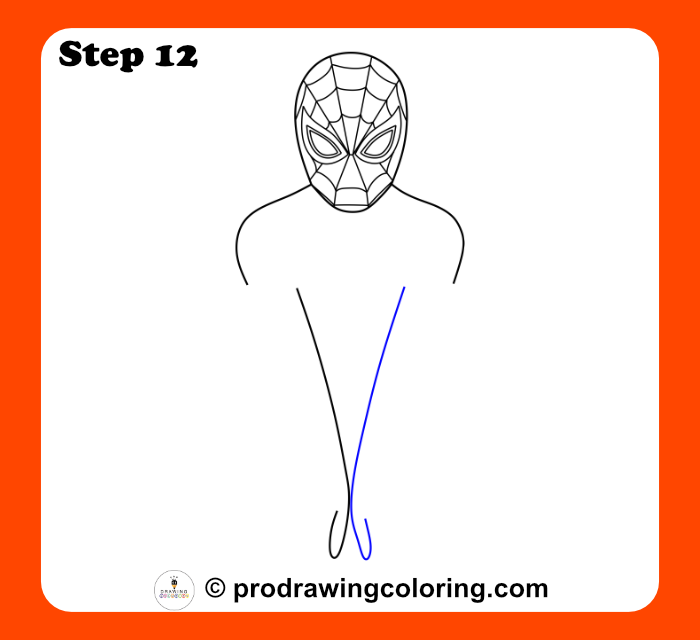
Step 13: Outline the Arms and Hands
Sketch the arms curving down toward the center, ending with hand outlines in a crouching pose.
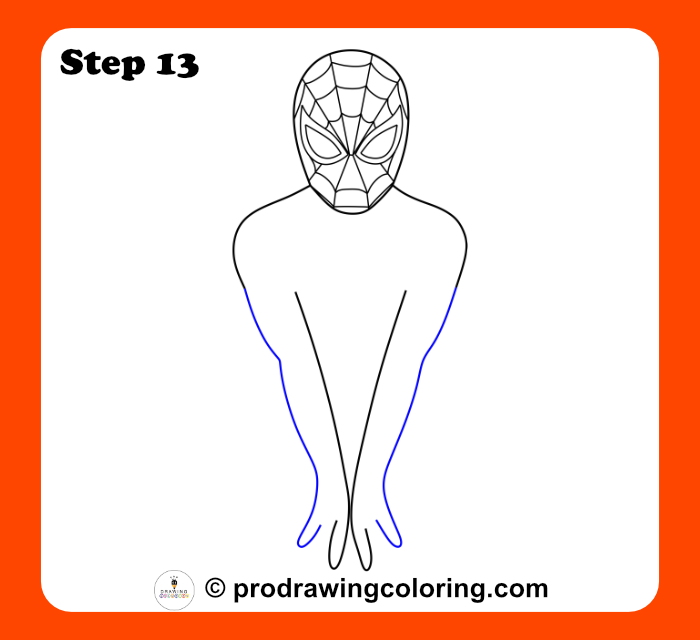
Step 14: Sketch the Upper Legs
Draw two wide curves on the sides to start the powerful thighs of Spiderman’s crouching stance.
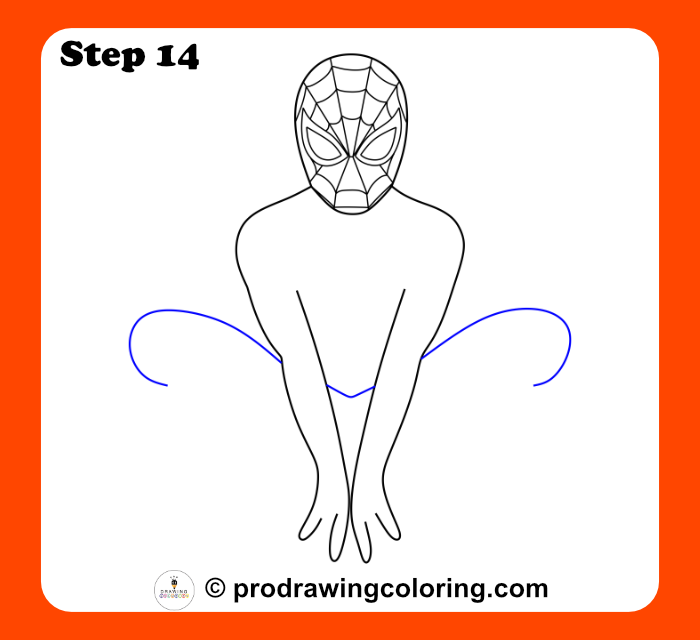
Step 15: Add the Inner Leg Curves
Extend the leg outlines by drawing inner curves that lead down toward the ankles.
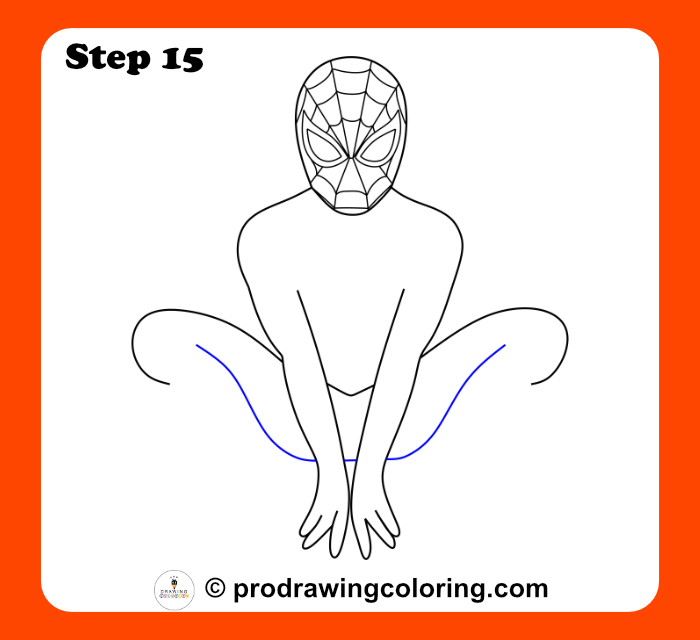
Step 16: Complete the Leg Structure
Connect the remaining lines to finish the outline of the legs and feet in the crouched position.
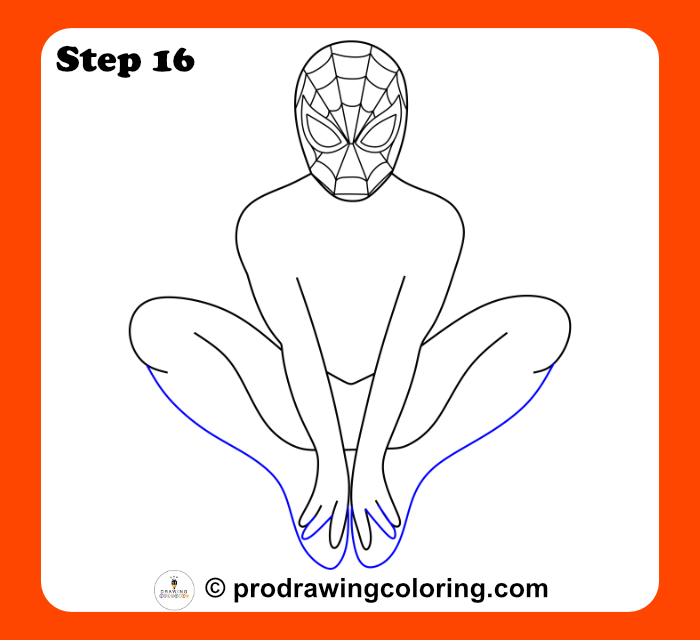
Step 17: Add Costume Boundary Lines
Draw lines across the forearms and calves to separate the red and blue sections of the suit.
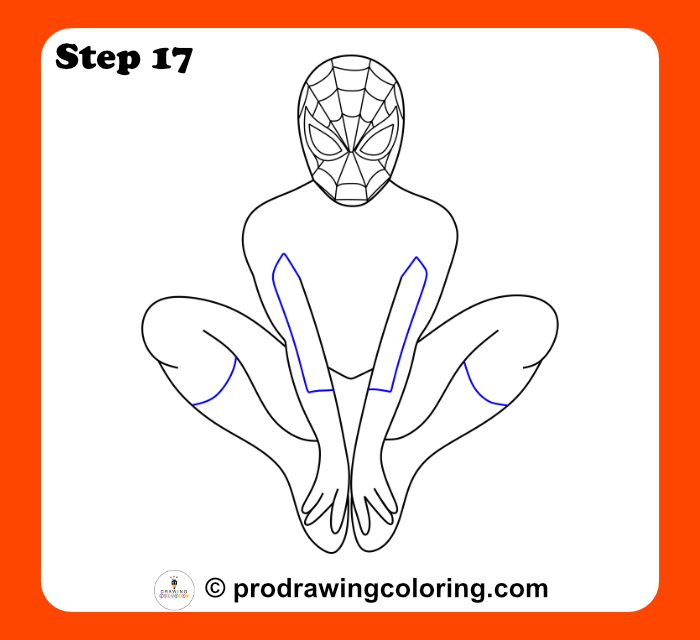
Step 18: Refine the Chest Costume Lines
Sketch the inner vertical lines on the torso and arms to define the suit’s iconic design.
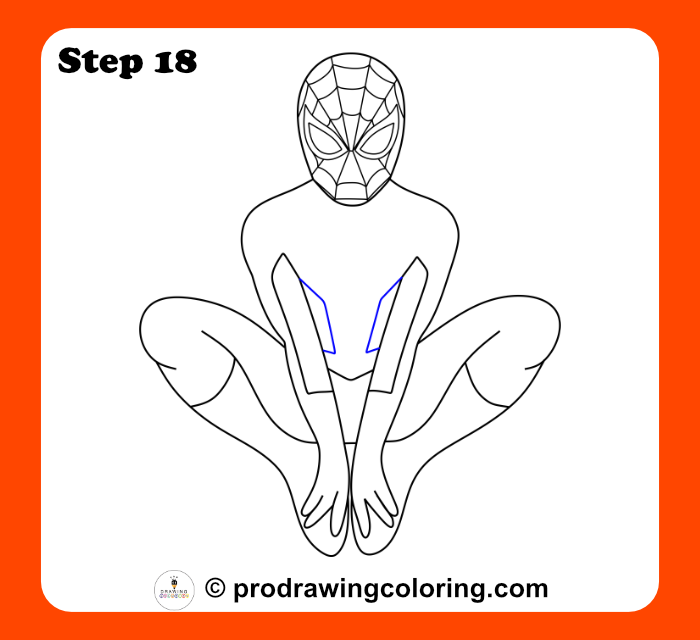
Step 19: Start the Chest Web Pattern
Draw several radiating lines across the chest and shoulders to begin the web pattern on the suit.
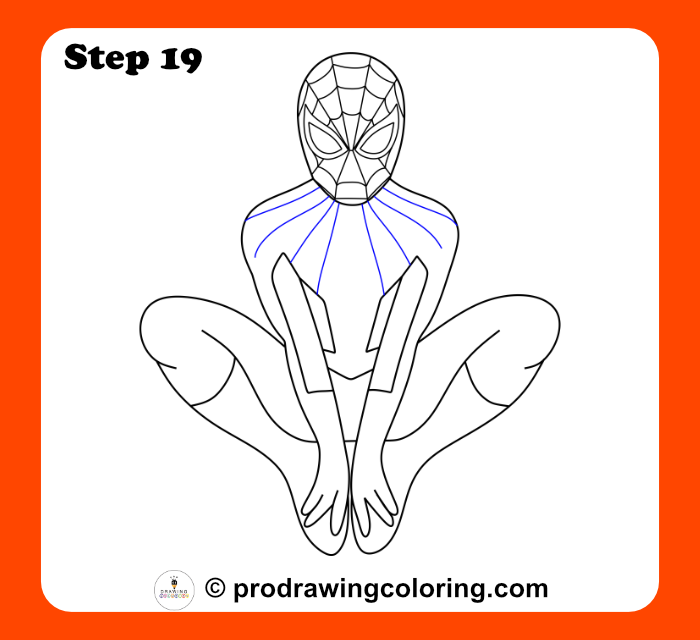
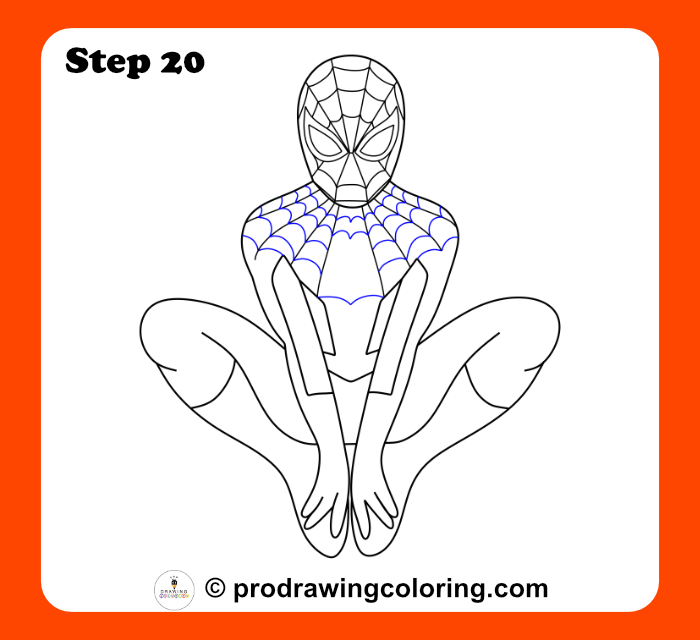
Step 20: Detail the Shoulder Webs
Add curved horizontal lines to the shoulder and chest sections to continue the web pattern.
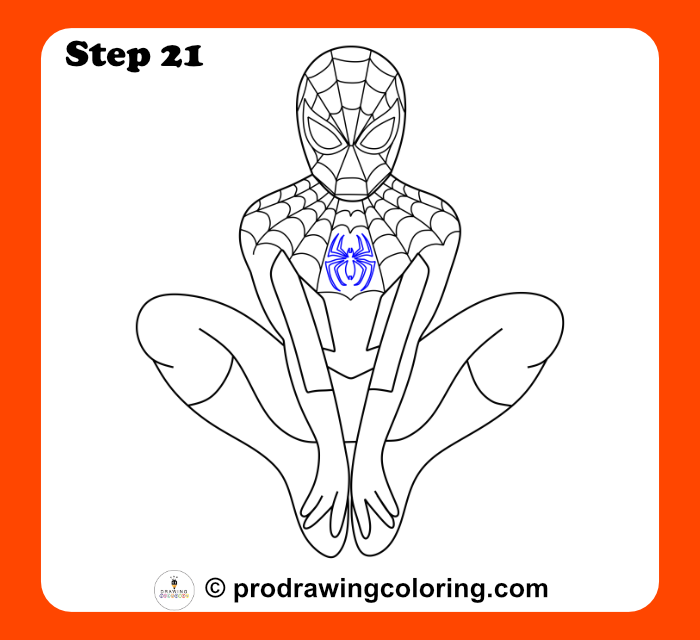
Step 21: Draw the Spiderman Logo
Sketch the iconic spider symbol in the center of the chest to give the suit its identity.
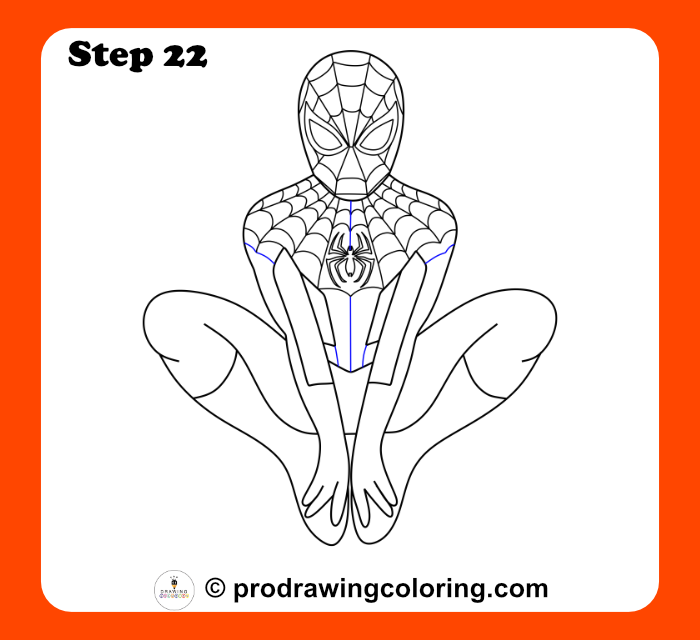
Step 22: Add the Center Suit Line
Draw a vertical line down the center of the torso and add the belt boundaries.
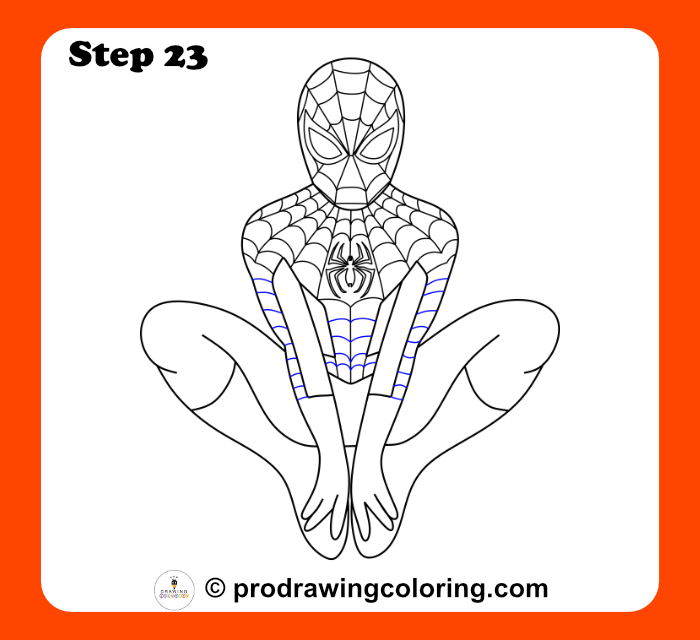
Step 23: Add Webbing to the Arms
Fill the forearm sections with small curved horizontal lines to finish the arm webbing.
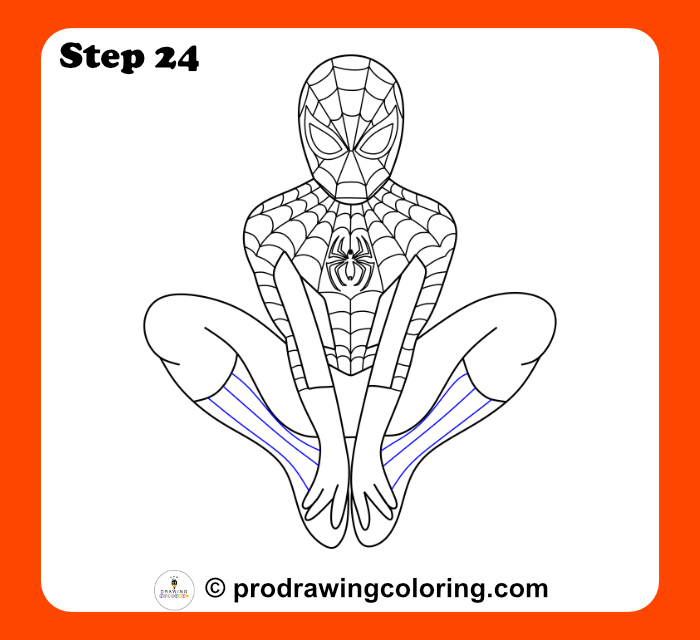
Step 24: Sketch the Boot Outlines
Draw the vertical lines on the lower leg sections to map out the webbing on the boots.
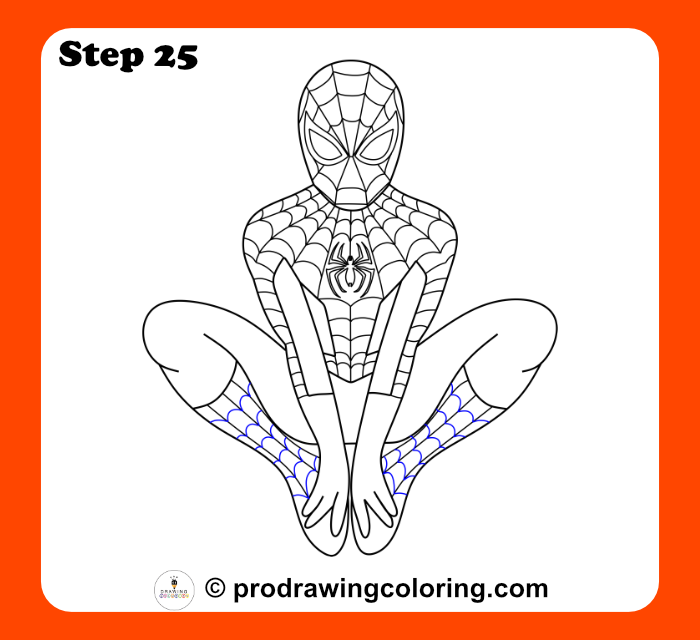
Step 25: Complete the Boot Webbing
Add horizontal curves across the vertical lines on the boots to finish the leg pattern.
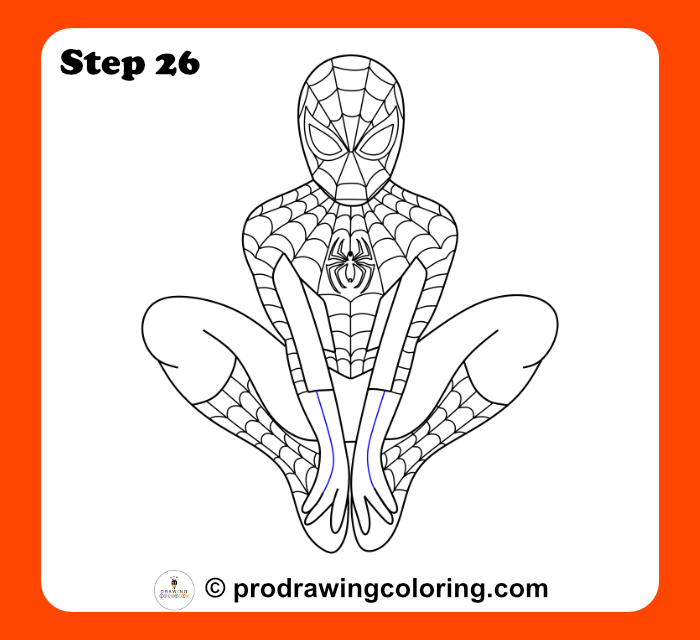
Step 26: Detail the Gloves and Hands
Sketch the vertical lines on the hands and fingers to prepare for the final web pattern.
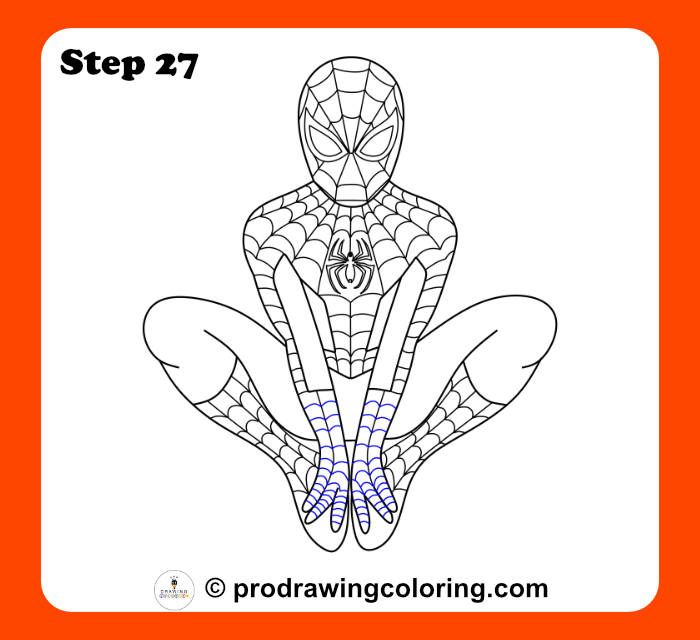
Step 27: Final Webbing and Completion
Add the final horizontal curves to the hands to complete your full body Spiderman drawing.
Download Your Free Spiderman Printable Artist Pack
Ready to take your skills to the next level? Grab our exclusive Free Spiderman Printable Artist Pack from Pro Drawing Coloring. This comprehensive PDF bundle includes our full 27-step guide along with professional techniques designed to help you master every detail of the web-slinger. Perfect for those looking for Spiderman coloring pages for children or adults, this gift pack provides the high-quality resources you need to transition from a beginner to a confident artist.
About This Guide: The Science of Drawing Spiderman
At Pro Drawing Coloring, we believe that everyone has an inner artist waiting to be unleashed. Our how to draw Spiderman guide is more than just a tutorial; it is a meticulously crafted learning experience that blends traditional art techniques with AI-optimized sequencing.
We analyzed thousands of artistic data points to break down the web-slinger into 27 manageable steps, ensuring that even absolute beginners can achieve a professional-looking Spiderman sketch.
Why We Use AI for Art Education
By utilizing advanced algorithms, we’ve identified the specific “stumbling blocks” where most students fail. Our AI-driven approach allowed us to:
- Simplify Complex Geometry: We’ve optimized the Spiderman face drawing by focusing on foundational shapes that the brain recognizes easily.
- Enhance Visual Clarity: Every line in our spiderman drawing step by step guide is rendered for maximum visibility and ease of replication.
- Curate Precision: From the Spiderman logo to the intricate webbing, our AI helped ensure every proportion is anatomically and stylistically accurate to the Marvel universe.
What Makes Pro Drawing Coloring Unique?
Our mission is to provide high-quality, accessible art content for creators of all ages. This guide includes:
- Printable PDF Packs: Perfect for offline practice and coloring.
- Multiverse Variations: Insights into drawing Miles Morales, Spiderman 2099, and the classic Peter Parker suit.
- Pro-Level Techniques: Lessons on shading and line weight that transform a simple easy spiderman drawing into a dynamic piece of comic art.